Uploading multiple files is a common task in web applications. In this tutorial, we'll learn how to upload multiple files in an ASP.net Core MVC application and view the uploaded files on another page.
The first step is to create a model that represents the uploaded files. We'll create a class called FileUpload with properties for the file name and content:
            public class FileUpload
            {
                public string FileName { get; set; }
                public byte[] Content { get; set; }
            }
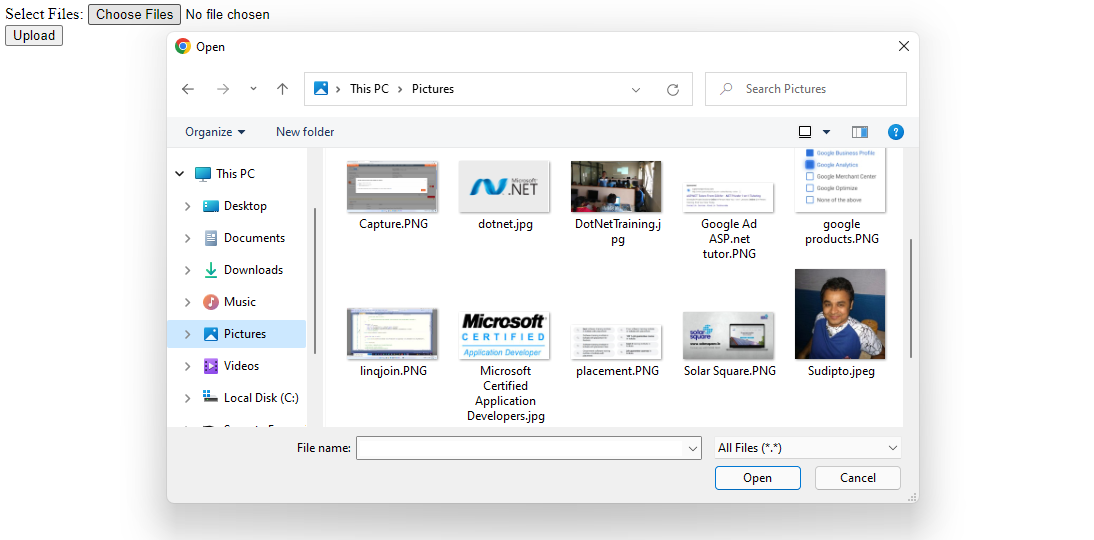
Next, we'll create a view that allows users to upload multiple files. We'll use the enctype="multipart/form-data" attribute in the HTML form to allow file uploads. We'll also use the tag to allow users to select multiple files:
<form method="post" asp-action="UploadFiles" enctype="multipart/form-data">
    <div class="form-group">
        <label for="files">Select Files:</label>
        <input type="file" id="files" name="files" multiple>
    </div>
    <button type="submit" class="btn btn-primary">Upload</button>
</form>
Now that we have a view for file uploads, we need to implement the action that handles the file uploads. We'll create a method called UploadFiles in our controller that reads the uploaded files and adds them to a list of FileUpload objects:
            [HttpPost]
            public async Task UploadFiles(List files)
            {
                List uploadedFiles = new List();

                foreach (IFormFile file in files)
                {
                    using (var stream = new MemoryStream())
                    {
                        await file.CopyToAsync(stream);
                        uploadedFiles.Add(new FileUpload
                        {
                            FileName = file.FileName,
                            Content = stream.ToArray()
                        });
                    }
                }

                // Save the uploaded files to a database or file system here

                return RedirectToAction("ViewFiles", "Home");
            }
In this code, we iterate over the uploaded files and add them to a list of FileUpload
objects. We use the CopyToAsync method of the IFormFile object to read the file content into a memory stream, and then create a new FileUpload object with the file name and content. Finally, we redirect the user to another action called ViewFiles in the HomeController.
Now that we have uploaded files, we need to create a view that allows users to view the uploaded files. We'll create a new view called ViewFiles.cshtml in the Views/Home folder:
<table class="table">
    <thead>
        <tr>
            <th>File Name</th>
            <th>Download</th>
        </tr>
    </thead>
    <tbody>
        @foreach (var file in ViewBag.Files)
        {
            <tr>
                <td>@file.FileName</td>
                <td><a href="@Url.Action("Download", "Home", new { fileName = file.FileName })">Download</a></td>
            </tr>
        }
    </tbody>
</table>
In this code, we display a table of uploaded files with their file names and download links. The download links use an action called Download in the HomeController that downloads the file content:
public IActionResult Download(string fileName)
{
    // Load the file content from the database or file system here

    byte[] fileContent = null; // Load the file content here

    if (fileContent == null)
    {
        return NotFound();
    }

    return File(fileContent, "application/octet-stream", fileName);
}
In this code, we load the file content from the database or file system and return it as a file with the File method. The application/octet-stream content type tells the browser to download the file instead of displaying it in the browser window.
Finally, we need to pass the uploaded files to the ViewFiles action so they can be displayed in the view. We'll modify the UploadFiles action to pass the uploaded files to the ViewFiles action:
        [HttpPost]
	public async Task UploadFiles(List files)
        {
            List uploadedFiles = new List();

            foreach (IFormFile file in files)
            {
                using (var stream = new MemoryStream())
                {
                    await file.CopyToAsync(stream);
                    uploadedFiles.Add(new FileUpload
                    {
                        FileName = file.FileName,
                        Content = stream.ToArray()
                    });
                }
            }

            // Save the uploaded files to the database or file system here
			            ViewBag.Files = uploadedFiles;

            return RedirectToAction("ViewFiles");
        }
In this code, we create a new List object called uploadedFiles and add each uploaded file to it. Then we pass this list to the ViewBag object, which is used to pass data between the controller and the view. Finally, we redirect the user to the ViewFiles action.
In this tutorial, we've learned how to upload multiple files in an ASP.NET Core MVC application and display them on another page. We used the built-in IFormFile interface to read the uploaded files and the File method to download them. We also used the ViewBag object to pass data between the controller and the view. By following the steps outlined in this tutorial, you should be able to implement file uploading in your own ASP.NET Core MVC applications.
To keep every session productive and distraction-free, please follow these simple guidelines:
Following these guidelines helps you focus better and ensures I can deliver the best learning experience in every class.
I prefer to start with a short 10-minute free call so I can understand:
Why? Because course content, teaching pace, and fees all depend on your needs — there’s no “one-size-fits-all” pricing. Please leave your details below, and I’ll get back to you to arrange a convenient time for the call.
Note: Payment is made only after your first class, once you’re completely satisfied. However, fees paid after the first class are non-refundable. This helps maintain scheduling commitments and allows me to reserve your preferred time slot with full attention.
We would like to extend our sincere gratitude and appreciation to Mr. Sudipto of Supernova Services for a tremendous professionalism, for his unique ability in sharing and teaching technical concepts to us! The abundance and wealth of knowledge we have received during the last few years will never be forgotten. He is a superb mentor, really knows how to approach any topic and present it in such way to ensure his student’s full understanding. He really cares about his students, as I have witnessed firsthand, Mr. Sudipto very often went above and beyond the call of duty to assist. He is a great person, very passionate about technologies, with unique talents and ability to teach spanning many different topics and technologies! I wish we could rank his services higher than available 5 stars here, perhaps 50 stars. Mr. Sudipto and Supernova Services, you are the BEST! Thank you for everything!!!
Boris Olshansky

It was an awesome experience for me in improving, especially my technical skills to a new paradigm, I learned and benefited immensely from the course and Sudipto Sir. The course design is meticulously well planned, very updated, utmost industry oriented, International standard, .... and after all Sudipto Sir is superb .... extremely knowledgeable .... student friendly .... very easily he make someone understand with very own our real life examples .... I have been immensely benefited during my career with TCS ....
Siddhartha Mohanty
I had a great time doing this course and everyone involved in the SUPERNOVA has made it a great experience. I have been recommending everyone I know. Thank you for all the assistance and feedback, it has been delightful.
Avijit Chakraborty

Very easy to understand...Explanation is very good...Really enjoyed this course and learned lot of things from scratch..The tutor is obviously extremely skilled by going through this course we can have the ability to develop our own application...
Thanks to SUPERNOVA SERVICES
Priyesh Joseph

Best Dot Net mentor..... learned a lot and gain an immense knowledge from him..... the way he teaches everyone is really outstanding.... 🙂🙂
Sayantani Mandal

Mr. Sudipto Mukherjee is one of the best instructors I have ever come across. His way of training is nothing short of art. He will teach you why you need or not need to write a piece of code rather than just saying that it should be done, and that makes coding enjoyable and the code very performance oriented. If you want to really learn, you have to really become his friend... He will then take you to the deep end. I am saying this from personal experience.... Just one thing... He does not come cheap, but you get much more than what you have paid for.
Sampat Das

Excellent tutor! Let's just say that as a bio-math student, I had next to no experience at coding. A few classes with Mr.Sudipto, and bam! His teaching methods are extremely student-friendly and interactive - The classes are never monotonous, and every new task he presented was an interesting one to look forward to. Within no time, I could write programs of my own. Definite recommend!! 👍🏻
Juhi